
Back to basics: how to contour like a pro

Everyone’s at it at the moment, but contouring looks more like a pain than a pleasure. Here’s my broken-down basics of contouring to get you from beginner to pro in a jiffy.
For those of you who haven’t a clue what’s going on, but want to learn, contouring is a makeup technique that combines cosmetics and expertise in creating highlights and shadows to give shape to and enhance natural facial features, especially cheekbones and lips. And how exactly does one go about creating all these shadows and highlights? It may sound and look intimidating, but it’s actually very simple once you have the right products and know-how.
Here’s what you’ll need:
Makeup: These days you can actually buy an entire contouring makeup kit, such as the Anastasia Beverly Hills Contouring Kit, or Mac’s All the Right Angles Contour Palette, but my best advice is to go out and sample palettes that suit your skin tone. I would also advise you to stick to matte products, reserving shimmer for highlighting. Steer clear of using bronzers to contour, unless you have a dark skin tone.
Brushes: Using the right brushes is the key to successful contouring, so be sure to invest in the right brushes for the job. You might want to start with small fluffy brushes, as these will help you to focus on your precision. Separate contouring and highlighting brushes are a must-have and a fan brush will also be helpful when applying products to the hair and jaw line.
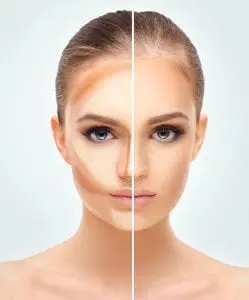
The process: The best way to think about contouring is to split it into two stages, where you contour with darker shades and then highlight with lighter shades (as shown in the image above). In general, the darker contoured areas are the parts of your face you want to detract light from, whereas the highlighted areas are the parts you want to draw attention to, primarily the raised sections of your face such as your forehead, cheekbones, forehead and chin.
Contouring: Applying your product in a vertical line to the sides of your nose will help to give the illusion of a smaller, thinner nose. This should be followed with highlighting to the centre of your nose and bridge to catch light and narrow your natural features. Applying product just below your cheekbones helps to give a sunken cheekbone effect, so go ahead and apply some to this area if its cheekbone definition you’re after.
Highlighting: Highlighting just above your cheekbones and under eye area brightens up your features and instantly freshens up your face. Applying highlighter to the areas under your eyebrows helps to create the illusion of high arches and makes your eyes pop. You’ll want to accentuate further raised areas, such as the centre of your forehead where it meets the nose of your bridge and your chin in order to draw focus away from a large forehead and/or prominent jawline.
The finishing touches: Lastly, you’ll need to blend everything in well and check your blending against natural light to make sure you look airbrushed as opposed to blotchy. Use a fan brush to dust a setting powder over your makeup to give it an airbrushed look.
Tips: If it’s a daytime look you’re going for, I’d suggest using powder products, but if it’s a more dramatic look for an evening event that you’re trying to achieve, opting for cream and liquid based products will give your makeup an added boost and a more glamorous finish.